
If you’re experiencing issues with your well pump, it’s important to identify the problem as soon as possible to avoid any further damage or inconvenience. One of the most common issues with well pumps is a faulty check valve. In this article, we’ll explore the signs and symptoms of a bad well pump check valve and what you can do to diagnose and replace it.
Signs of a Bad Well Pump Check Valve
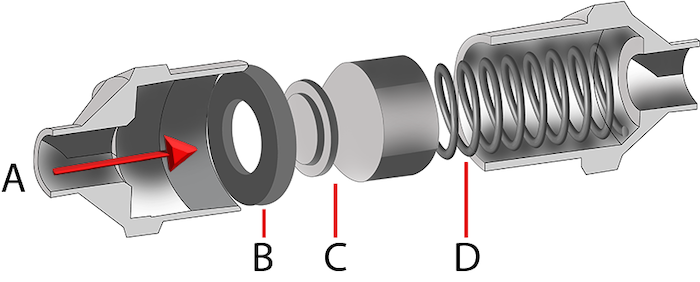
A well pump check valve is designed to prevent backflow and ensure that water flows in only one direction. If the check valve is not functioning properly, it can cause several problems, including:
- Water flowing backward: If water is flowing backward through the system, it’s a clear indication that the check valve is not working correctly.
- Sump pump running constantly: If the sump pump is running constantly, it’s a sign that the check valve is not able to prevent backflow.
- Water hammer: Water hammer is a common problem that occurs when the check valve is not functioning properly. It’s characterized by a loud banging noise in the pipes.
- Reduced water pressure: If the water pressure in your home is low, it could be a sign that the check valve is not working correctly.
- Air in the water line: If there’s air in the water line, it’s a sign that the check valve is not able to prevent backflow.
Diagnosing a Bad Well Pump Check Valve
To diagnose a bad well pump check valve, you’ll need to perform a few simple tests. Here are some steps you can follow:
- Check the water flow: Turn on the faucet and check the water flow. If the water is not flowing properly, it could be a sign that the check valve is not working correctly.
- Check the sump pump: If the sump pump is running constantly, it’s a sign that the check valve is not able to prevent backflow.
- Listen for the water hammer: Turn on the faucet and listen for the water hammer. If you hear a loud banging noise, it’s a sign that the check valve is not functioning properly.
- Check the water pressure: Check the water pressure in your home to see if it’s low. If it is, it could be a sign that the check valve is not working correctly.
- Check for air in the water line: Turn on the faucet and check for air in the water line. If there’s air in the line, it’s a sign that the check valve is not able to prevent backflow.
Replacing a Bad Well Pump Check Valve
If you’ve diagnosed a bad well pump check valve, it’s important to replace it as soon as possible. Here are some steps you can follow to replace a bad check valve:
- Turn off the power: Turn off the power to the well pump and disconnect the electrical connections.
- Drain the system: Drain the water from the system by opening the drain valve.
- Remove the old check valve: Remove the old check valve and discard it.
- Install the new check valve: Install the new check valve and connect it to the system.
- Turn on the power: Turn on the power to the well pump and test the system to ensure that it’s working properly.
Conclusion
A faulty well pump check valve can cause several problems, including water flowing backward, sump pump running constantly, water hammer, reduced water pressure, and air in the water line. To diagnose a bad check valve, you’ll need to perform a few simple tests, including checking the water flow, and sump pump, listening for water hammer, checking the water pressure, and checking for air in the water line.
If you’ve diagnosed a bad check valve, it’s important to replace it as soon as possible to avoid any further damage or inconvenience. By following the steps outlined in this article, you can easily diagnose and replace a bad well pump check valve.
Leave a Reply